This onboarding guide helps get you set up on SeedLegals and ready for all of our services and features, which you can find here.
Our smart platform creates all the necessary documentation for your funding rounds, S/EIS applications, option schemes (and much more!), which are official and legal documents, so accuracy is key. Please make sure to carefully go through each of the points below, so that all of your details on our platform are correct and any documents we generate for you, contain error-free information.
Let’s get started.
Contents- Company details
- User & Roles
- Setting up your cap table
- Do a share split
- How to add historical share issuances
- Share Certificates
- Create a Founder Agreement
- Historical Share Transfers
Company Details
Once you’ve set up your company on the platform, please head to your Settings page by clicking on “Settings” at the left bottom corner of the page. Then click on “Details”.
You will need to ensure that all of the details match your Companies House webpage, which you can find with a quick search here. Please check the following:
- Does your company name match Companies House?
- Does your incorporation date match Companies House?
- Does your company type match Companies House? Usually, this will either be Ltd or Limited.
- Is the correct currency appearing? If your company is registered in the United Kingdom, your currency should be Pound Sterling.
- Is your jurisdiction accurate?
- Does the company number match Companies House?
- Please check your UTR number. This article explains where to find your UTR number for your company. If that doesn't help, HMRC will give you a copy of the number if you go through this process.
- Does your company address match Companies House?
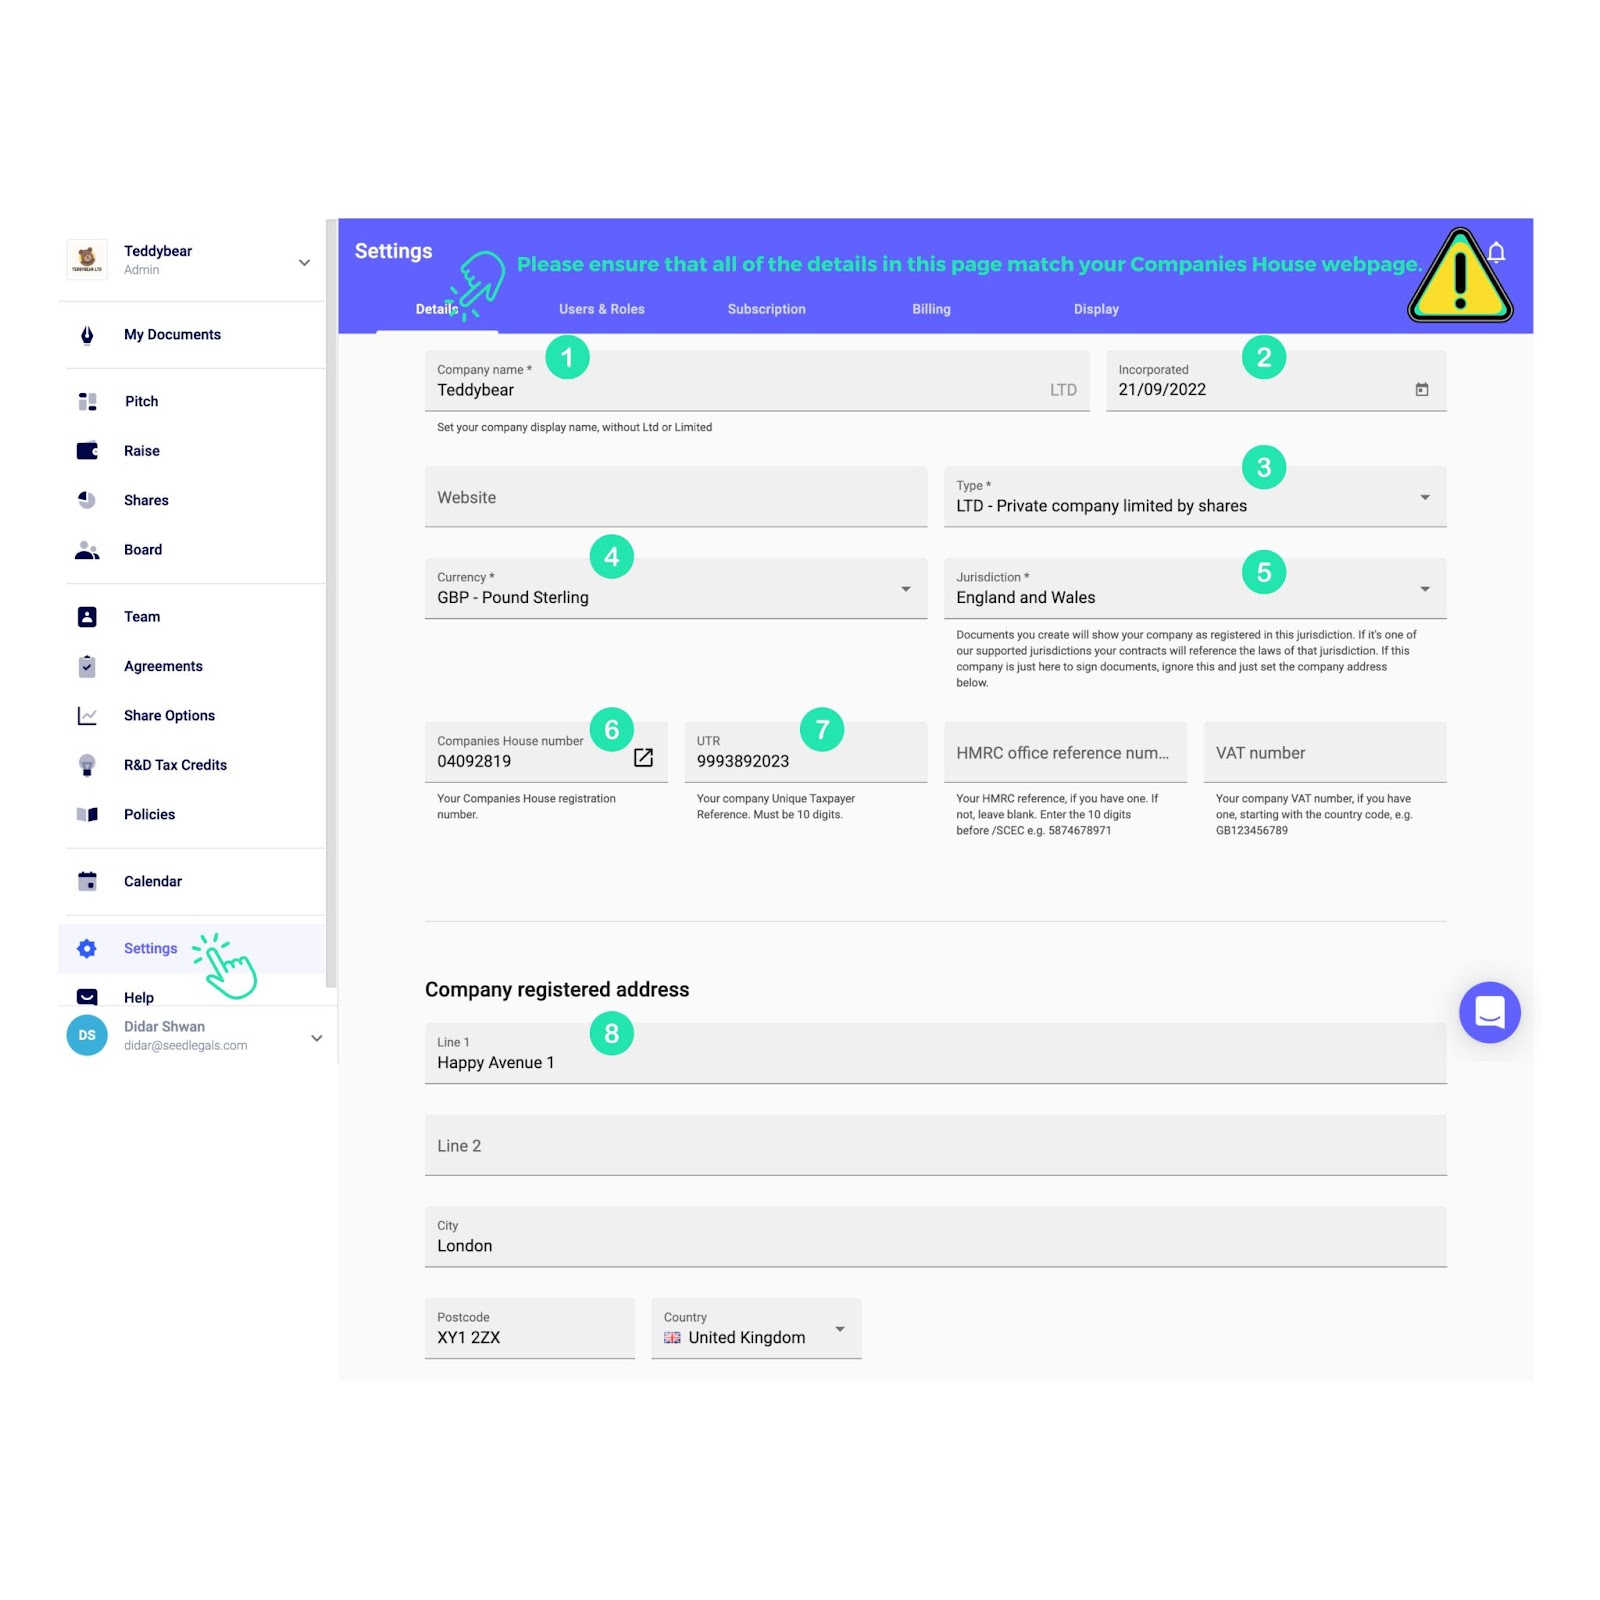
If you’ve gone through point 1 to 8 and everything looks to be accurate - congratulations - you are one step closer to being ready for our SeedLegals offerings.
Users & Roles
On to the next step! Please click on User & Roles at the top bar in your Settings tab. From this tab, you will be able to manage your director’s, founder’s, shareholder’s, and team member’s access.
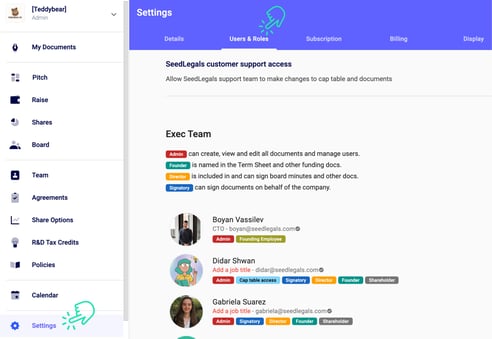
You will then be able to assign various types of access by clicking on their name and then on the relevant tags:

Please ensure that:
- All your directors have the directors tag. Please only add this tag if the individual is listed as a director on Companies House.
- There are no duplicate accounts.
- Everyone has their legal names displayed rather than nicknames.
- Everyone has their address added.
Please bear in mind, if a user has a tick next to their name then they have verified their account. In this case please ask them to change their name or address by logging in to SeedLegals > clicking their name in the bottom left corner > clicking the profile button and amending their name or address. If they don't have a tick next to their name, you can change names and addresses yourself in the Users & Roles section > clicking the 3 dots next to their name.
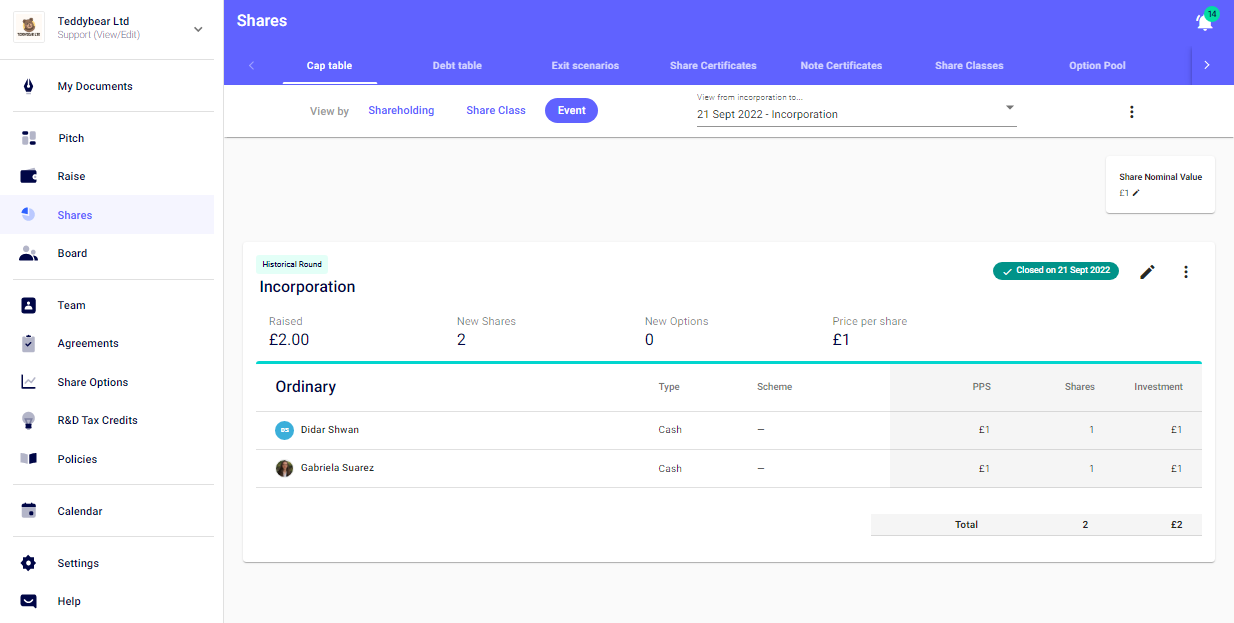
Setting up your Cap Table
Your cap table should be an exact chronological match to your Companies House. Here are the basics of what to set up to get you started, and this article goes into further detail on how to set up your cap table and make any changes.
The first step to setting up your cap table is adding your Incorporation event. When you first set up your Company on SeedLegals, head to the Shares section in the navigation pane. Once here, you can set up your incorporation round step-by-step (if you have already set up your incorporation and want to edit it or add another historical event, skip this step).
.jpg?width=531&name=Untitled%20design%20(1).jpg)
You can find your incorporation details on your Companies House. This document is also called ‘NEWINC’. Look for the page titled ‘Statement of Capital (Share Capital). Here you will find the share class and the rights attached to the shares.

The next page of the incorporation document, titled ‘Initial Shareholdings’ has the information to complete your incorporation event. This is the incorporation shareholders (these are likely to the Director/s at the point of incorporation, the number of shares the shareholders has each, and the price per share.
Please use this guide to set up your cap table on the platform.

The price per share is usually the nominal value of the shares at incorporation, but if this is not the case for the shareholders, you can find the price per share by dividing the amount paid by the number of shares. Once you have completed these steps, your incorporation event will be added to your cap table.
If you have already completed the above steps and need to amend your Incorporation round. You and do so by clicking the pencil on the Incorporation event and editing the details. Please ensure the date of the event is the same as the date of your incorporation.
.jpg?width=670&name=Untitled%20design%20(2).jpg)
Nominal Value:
You can see your nominal value on your cap table. Once you have added your incorporation event, the nominal value should reflect the nominal value on your incorporation documentation. Once you perform a share split, your nominal value will change, so always ensure your nominal value matches your latest filings.
.jpg?width=562&name=Untitled%20design%20(3).jpg)
The Cap Table will show ‘Your share nominal value does not match the price per share at incorporation(£_)’ if your nominal value in a later round is different to your nominal value at incorporation.
Have a look here to find out the difference between a share’s nominal value and the round price per share.
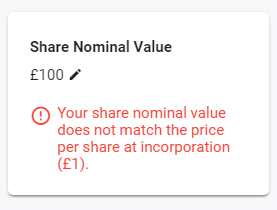
How to fix this?
Click on the little pencil next to the share nominal value and make sure it matches the share nominal value of the incorporation round.
So your nominal value will remain the same for every share issued in the company and will only change if you complete a Share Split or a Share consolidation.
Perform a Share Split
If you have les than 100,000 shares in the company, you'll need to do this before raising investment so your investors get the right percentage of equity in the company. The good news is this is simple, quick and free on the platform. This article walks you through how to do it.
If you have already performed a share split, you will need to reflect it and can follow the steps in the above article - but you will not need any of the documentation.
How to add historical share issuances
If you have issued shares by filing SH01 forms on Companies House, you need these reflected on your cap table. You may have issued shares during a funding round, issued to your co-founder, if you exercised options or converted an off-platform Advanced Subscription Agreement.
Please follow the steps below to add a historical round:
- Click on Shares > Cap table
- Click on Event at the top bar
- Click on the three dots
- Click on Add Historical round
- Add historical round and shareholders
.jpg?width=575&name=Untitled%20design%20(5).jpg)
Fill in the details from the share issuance and click done:

Then please click on the pen icon:
.jpg?width=670&name=Untitled%20design%20(6).jpg)
and then click on " Add shareholder" to add the shareholder the shares were issued to:
.jpg?width=670&name=Untitled%20design%20(7).jpg)
Depending on how many share issuances you need to record, go through these steps again for any further share issuances you need to reflect from your Companies House onto your cap table.
Share Certificates
The dates for all of your share issuances - whether that would be for an external share register or a compliance form - are imported from the share certificates tab, not from your cap table. You can find the share certificates tab by going to Shares > click on Share Certificates in the top bar:
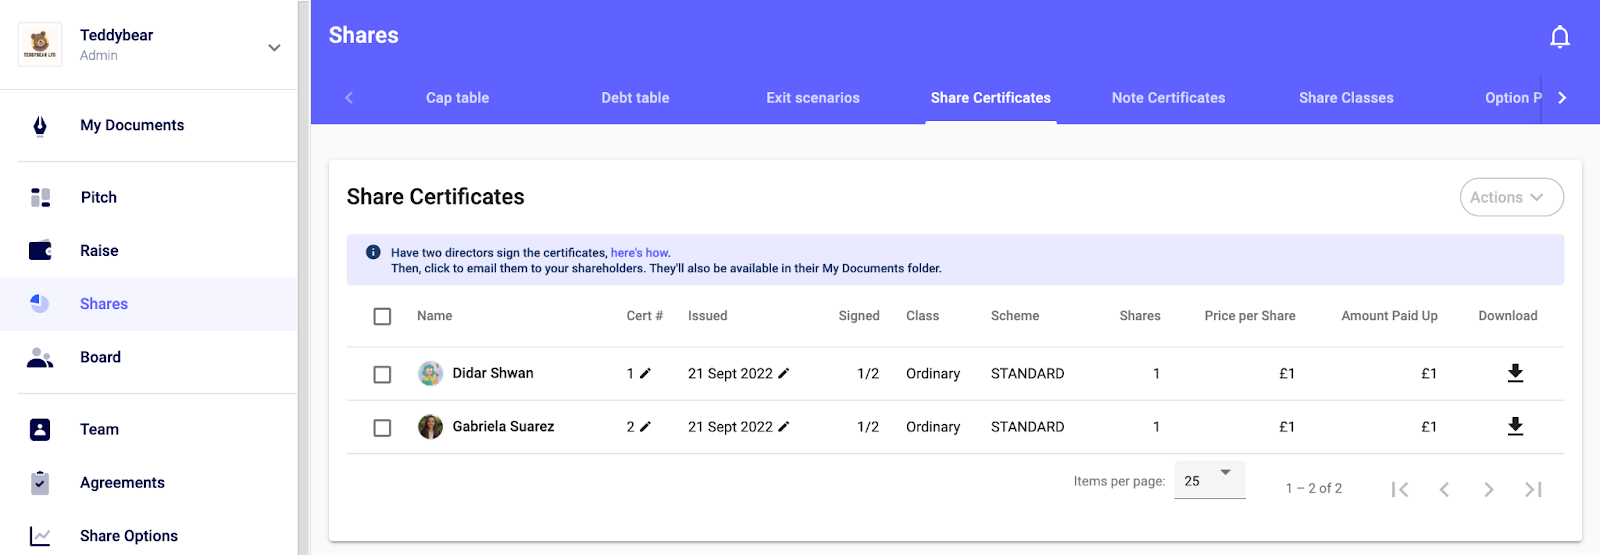
Please ensure that:
- The acquisition date for your incorporation shares matches your incorporation date.
- If you have any other share issuances, please make sure that the dates are correct and match your Companies House filings. You can check the dates by going to your Companies House website and finding the relevant SH01 for the share issuance.
You can edit the dates by clicking on the pen next to the relevant date. If the share certificate is archived (there will be a little lock next to the name, you can click the box next to the name > Action > Unarchive > Change date > Archive again.
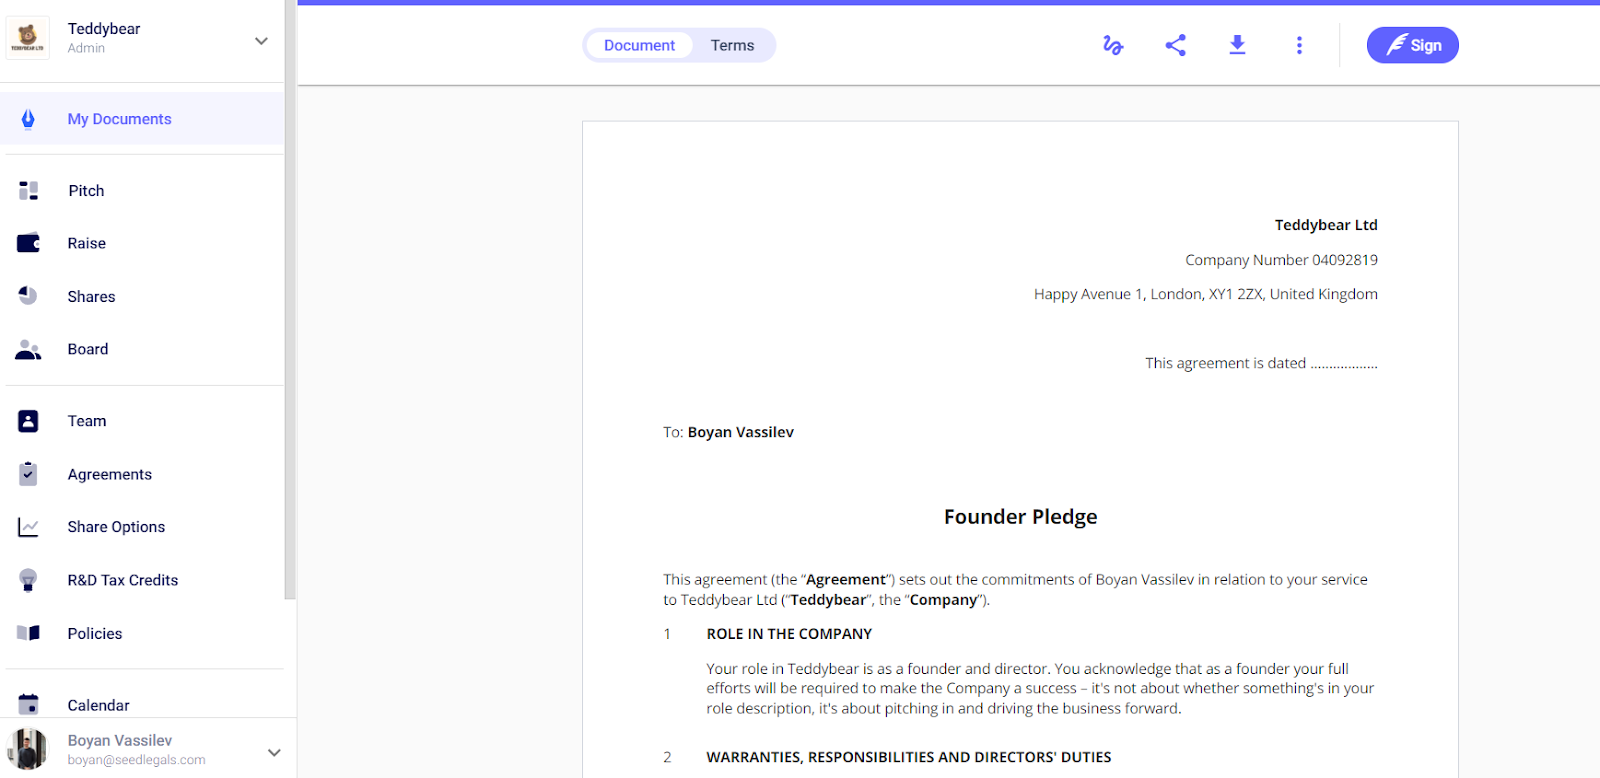
Create a Founder Agreement
Creating a Founder Agreement is quick, simple and it can be done on the platform in two stages.
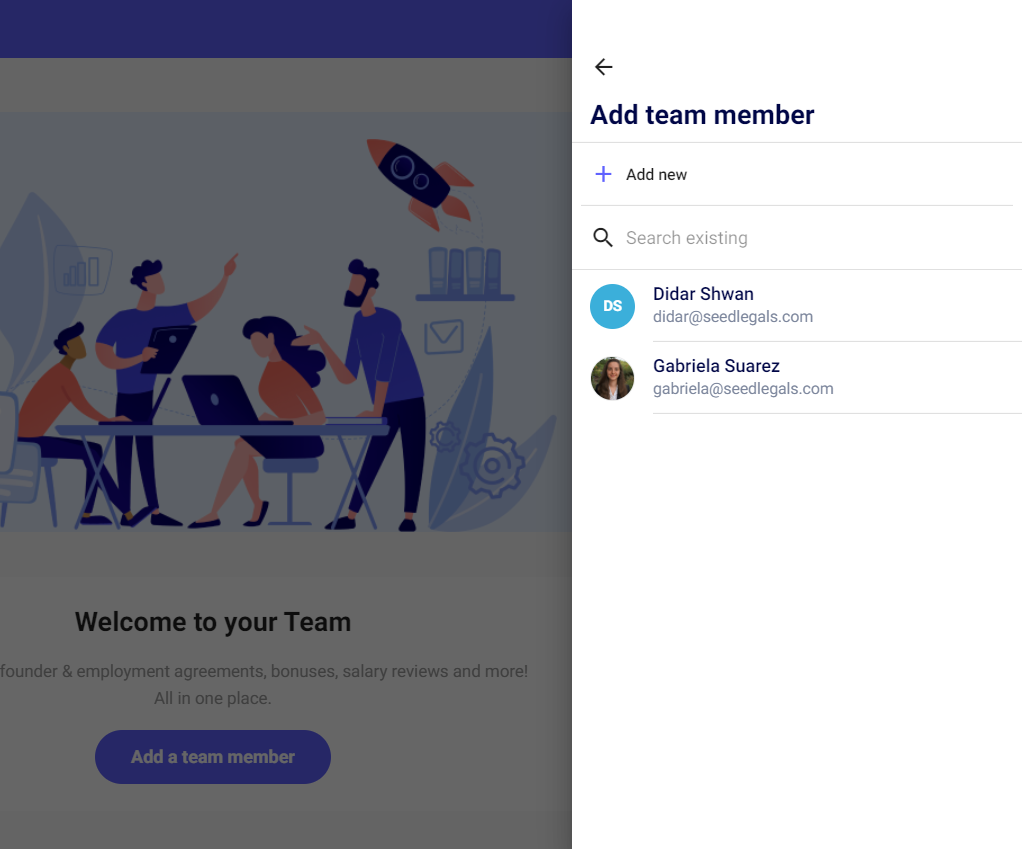
First, you need to create the team member to whom you are creating the founder agreement. To do this, go to the ‘Team’ side panel and select ‘Get Started’. You will then see a heading saying ‘Welcome to your Team’. Select Add a team member. In the side panel that pops up, select ‘Founder’. There, you will be prompted to either create a new team member from scratch or select an existing user on the platform (see below).
If you are creating it for an existing user on your company profile, simply select the relevant user and add their start date, job title and salary. If the Founder is not being paid a salary leave it as 0.
If however you are creating an entirely new user not currently on the platform, select ‘Add new’ and complete enter their details. Please remember to add in an email address, the platform will not allow you to continue with making the agreement without one.
You will then be prompted to add the Founder to a team. Here, you can place users into individual teams if you so wished, such as Management, Manufacturing, Design, etc. This is not needed to proceed so feel free to skip it if you wish.
Once that is completed, you can begin the second stage, which is creating the founder agreement.
Select the individual you wish to create the Founder Agreement, select New Agreement and then select Founder Agreement.
Doing this will bring up your agreement for you to set up the terms you wish, as seen below. All the information that is already populated in there are market standard, but do have a look at them and change them as you wish.
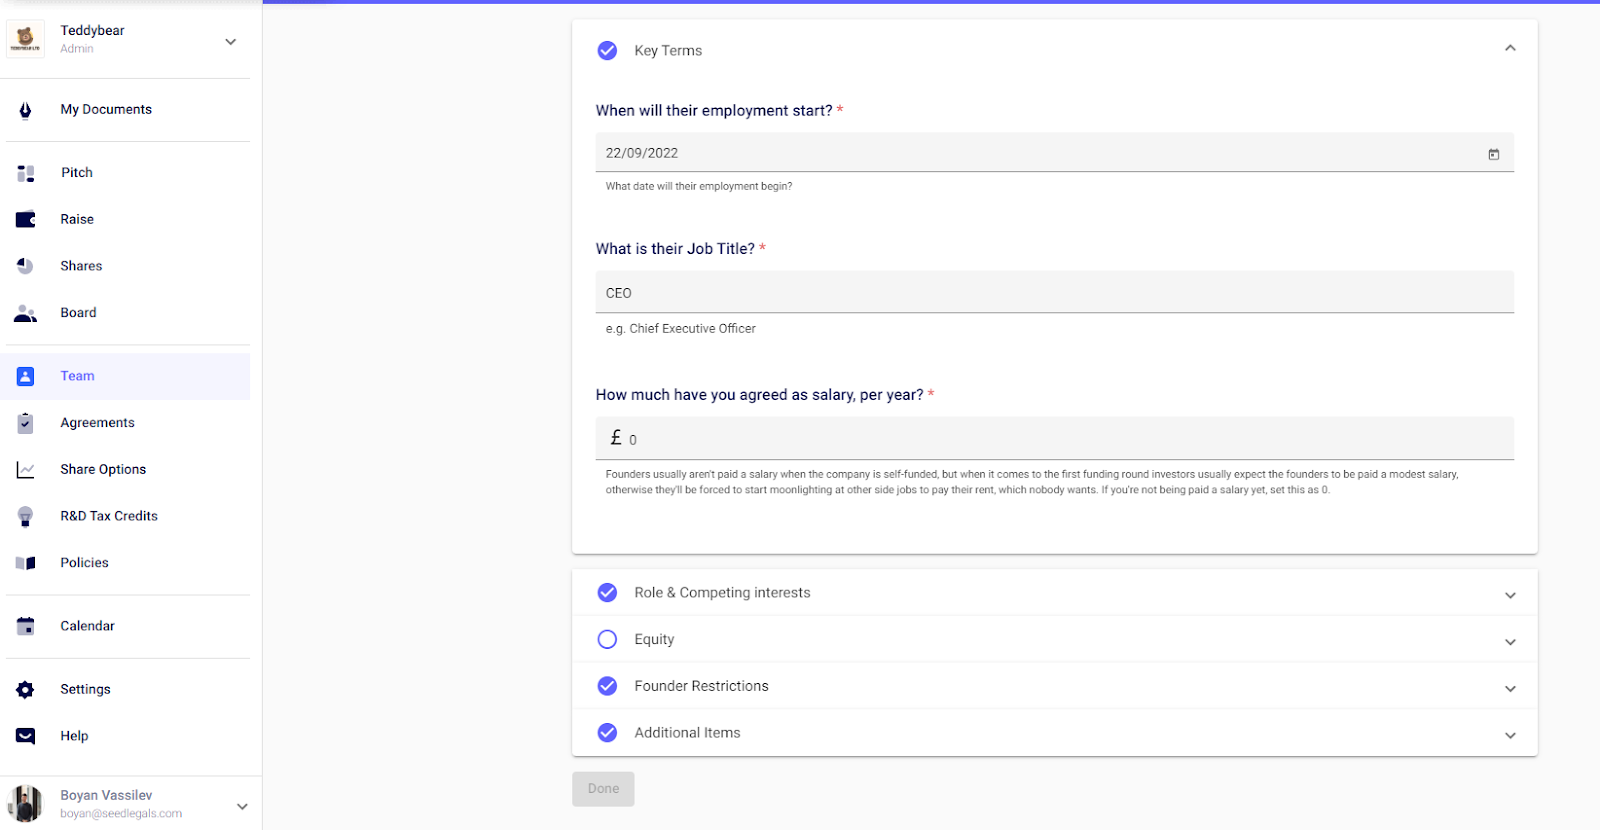
Note that in the screenshot above, this would be an incomplete agreement as the equity section has not been filled in. You can tell this is the case because there is no blue tick next to equity. Please make sure it is all complete before selecting ‘Done’ so that the agreement can be signed.
The final thing left to do now is to sign the agreement! If you are creating the agreement for yourself, simply hit the ‘sign’ button on the top right of your screen.
If you have created one on behalf of someone else to sign, then select the share button and input the email address of the relevant person to send them the agreement to sign.
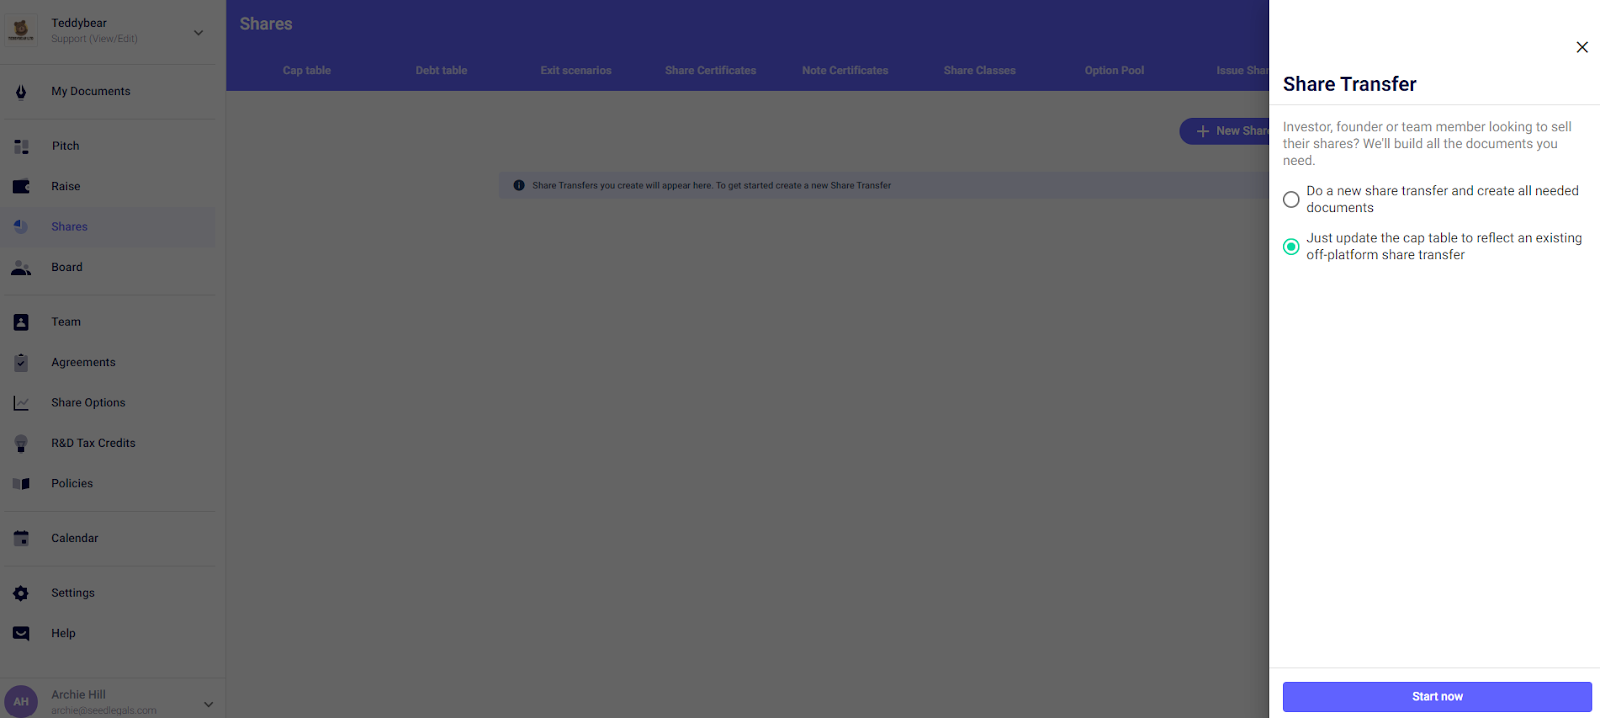
Historical Share Transfers
To reflect a historical share transfer, head to the ‘share transfers’ tab at the top of the shares tab.
.jpg?width=670&name=Untitled%20design%20(8).jpg)
Click ‘+ new share transfer’ and then select ‘just update the cap table to reflect an existing off-platform share transfer’. Then hit Start now – you'll notice the document charges disappear, and you won't be charged.
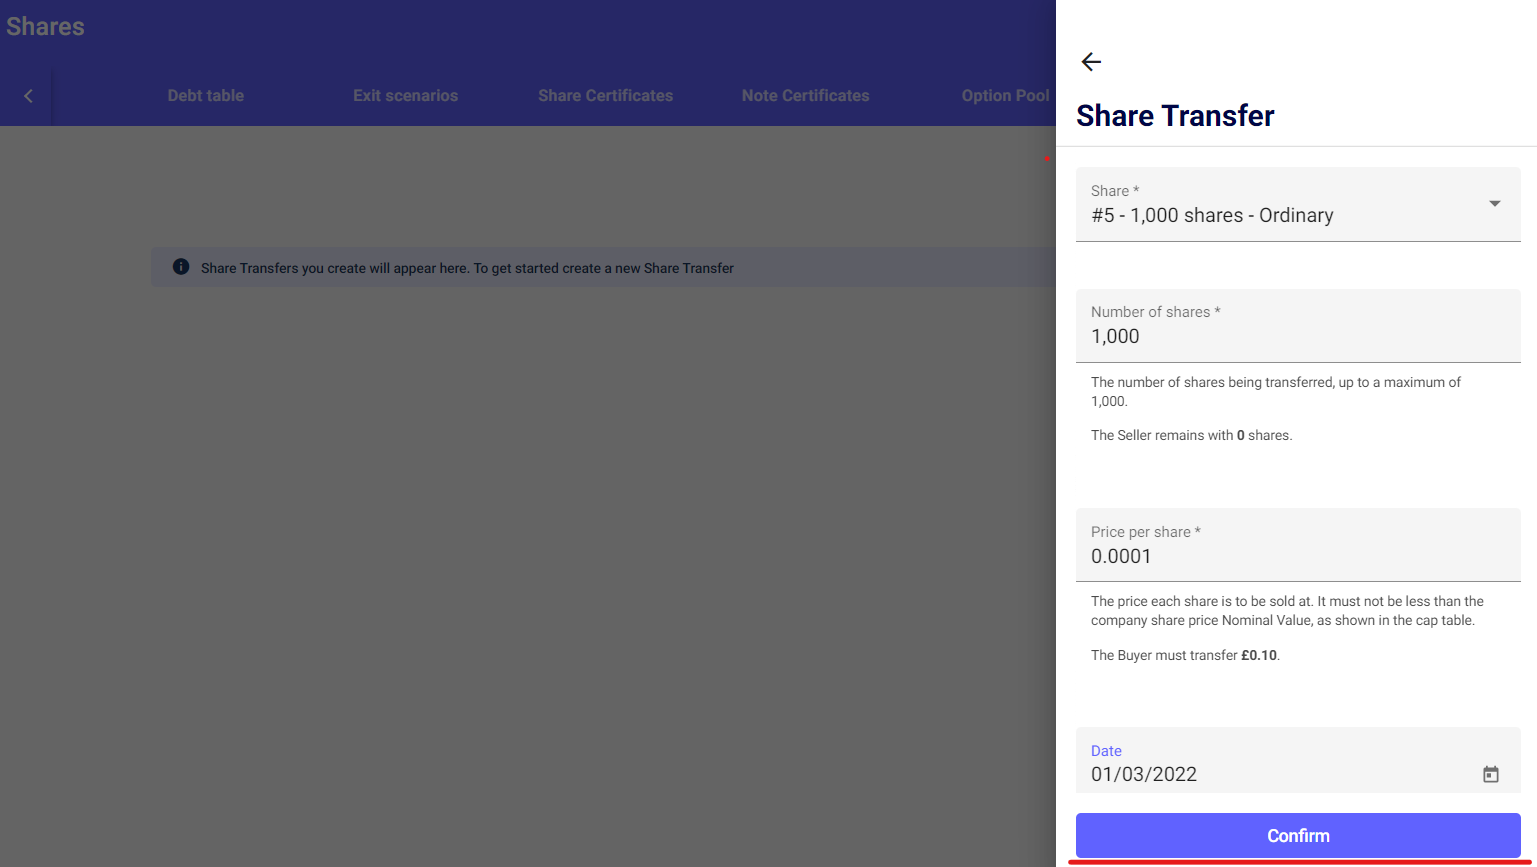
Select the Seller, Buyer, number of shares to be transferred, the price per share and the date of the share transfer. To finalise the update click "Confirm."
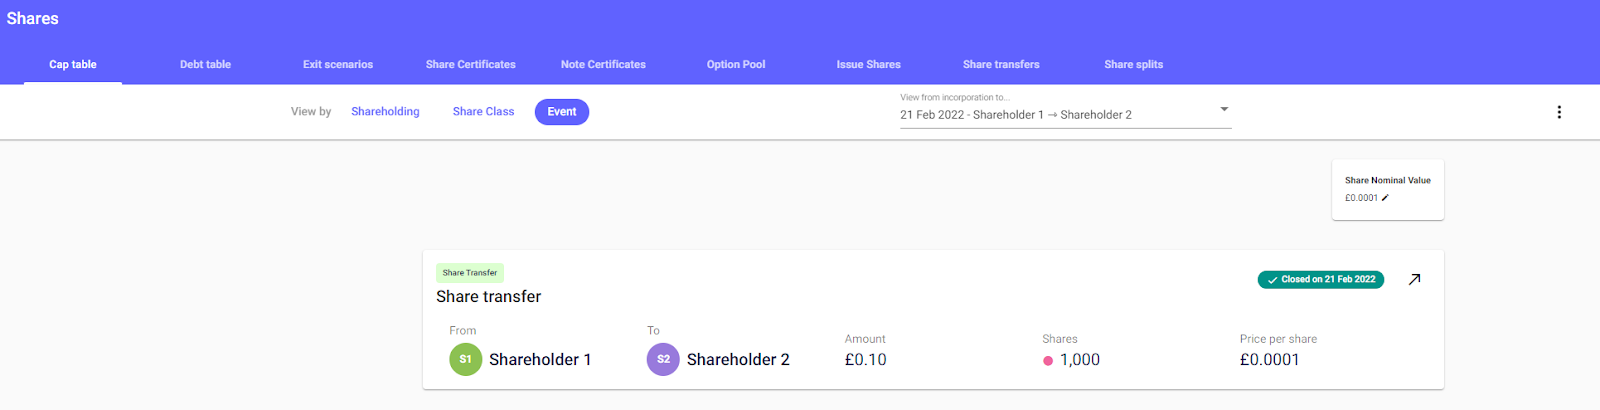
It's important that this Share Transfer also shows in the cap table on the date that it occurred. Once the share transfer has been approved, head to Shares, click the three dots in the top right, and click export list of shareholders (PDF) and you will see the Transfer on the date that it occurred.
.jpg?width=610&name=Untitled%20design%20(9).jpg)
Finally, your Cap Table will automatically update to reflect the transfer! You'll be able to double-check the date by going to: Shares > View by "Event."
Once you have completed all the the above steps, you are ready to get started with your funding round, SeedFASTs, or option schemes! Remember: It's important to keep your cap table and Companies House up to date.
Please note that you will need to update your Shareholder Register, although the Cap Table on SeedLegals can be downloaded as a list of shareholders, you will need to maintain a Shareholder Register offline alongside several other statutory registers. Please see our handy guide here for more information on what these need to contain
Any questions?
If you have any further questions, click the bottom right button to message us in chat - we'll be happy to help. 💬