How do I issue share certificates?
SeedLegals creates beautiful share certificates for your shareholders and investors, here's how to issue them.
SeedLegals automatically creates a share certificate for each shareholder in your cap table.
-
In the case of investors in your latest funding round, as soon as you close your round (by hitting the ISSUE SHARE CERTIFICATES button at the end of the funding round) they'll automatically turn into shareholders and get added to the cap table, ready for you to issue their share certificates to them.
Here's how to issue share certificates:
-
Select Cap Table in the left menu.

-
Click the Share Certificates tab.

-
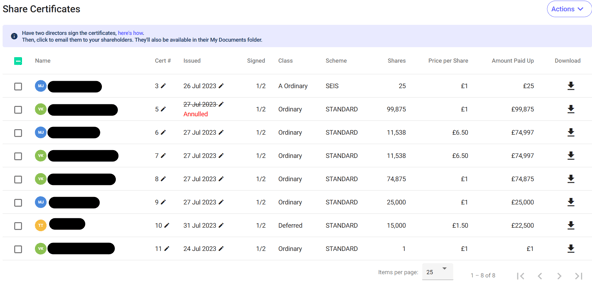
You'll see a share certificate for every investment, ready to date and sign.

Check the dates
Make sure the share certificate is dated the same date (or anytime after) the investment was received
- Are you dating the share certificates for multiple investments in a funding round?
- This is typically done by combing together all the SEIS investments and dating them all as the date that the last SEIS monies were received. You can then batch and date all the non-SEIS and EIS investments as the date that the last of those monies were received.
- The reason for this is that when you need to do your SEIS/EIS Compliance, HMRC needs one SEIS1/EIS1 form for every date that shares were issued. It's therefore much more efficient to group all SEIS monies in a given round on one date (the same goes for EIS monies, as well).
- But in both cases, remember that you should always use the date that the last of those monies was received in that round.
- Are you dating the share certificates for multiple investments after a SeedFAST conversion?
- The allotment date should be the latest of the date of the board resolution, the date the shareholders resolution was signed by 75% of voting shareholders and the date the conversion agreement is fully signed.
- If the conversion contains both SEIS and EIS shares, then the SEIS allotment date should follow the above and the EIS allotment should be dated one day after.
- Are you dating the share certificates for multiple Instant Investments?
- The allotment date should be the latest of the date of the board resolution, the date the shareholders resolution was signed by 75% of voting shareholders, the date funds are received and the date the investment agreement is fully signed.
If you need to change the date of any share certificate just click the Pencil icon next to the date and set a new date.
Signing the share certificates
If the Company has two or more Directors...
- Then the share certificates need to be signed by two Directors. So get each Director to go to the share certificate page (Shares > Certificates tab) and click the SIGN ALL button, which signs all share certificates in one click.
- If you don't want to sign all, you can sign multiple share certificates in one click - just select one or more and go Actions > Sign Selected.
If the Company has one Director...
- Then you'll need to get a Director and a Witness to sign the share certificates.
-
If a user who only has Admin and Signatory roles (in the Users & Roles page) signs the share certificates then their signature will show as a Witness.
-
If they also have the Director role then their signature will appear as a Director.
Adding a witness:
Head to Settings > Users & Roles and click on the New User button. Add the email and name for the witness, and give them both Admin and Signatory roles. Don't forget to also add their address and job role (that will appear on the share certificate as their Witness Occupation).
Invite the Witness to sign up to the platform.
Once they have logged in, direct them to the share certificates page (Shares > Certificates tab). Once there they can click the SIGN ALL button.
Once the share certificates are signed by the Witness you can head back to Users & Roles and remove them from your company profile.
Send the signed share certificates to your investors
As soon as a share certificate is signed by both parties, it's automatically available in the Documents folder for that shareholder.
If you want to also email the share certificates to your shareholders just select one or more certificates and select Actions > Email Share Certificates.